


DIY: Gratitude Tree Thanksgiving Craft for Kids
The temperatures are finally starting to cool down and with the change of seasons comes a change in mindset for everyone in my house. The rush of back to school has died down, routines have been set and extended family begins to descend upon our fair-weathered city.
As we head into the end of the year, I always appreciate November. I’ll take any opportunity to stop, pause, and ponder.


My whole life I’ve always been one to encourage reflection among those around me. It’s one of the reasons why I love to write and keep journals upon journals on my bookshelf. Celebrating what you are most grateful for always puts life in a different perspective.
When I became a mom, I remember talking to my husband about how we would raise our children to appreciate life, be thankful for blessings and love others. It’s important to me that my children live each day with grace and gratitude.
This year, now that kids are a little bit older (2 and 4), we created a way to show we appreciate each day with the help of a Gratitude Tree. As craft projects go, this tree was so quick to make and requires only minimal supplies. You probably already have a lot of what you need at home!
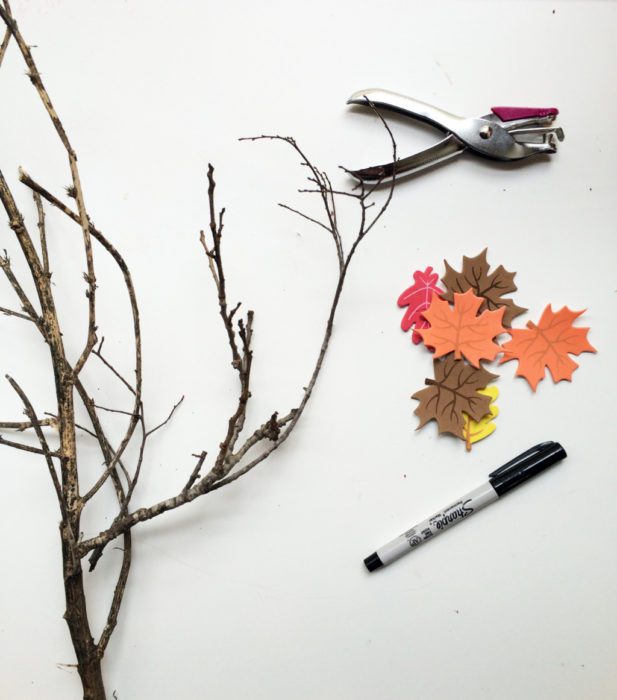
Supplies:
- A few small tree branches
- Acorns or rocks
- Mason jar or pot
- Hole punch
- Colored leaves (your choice of foam pieces, felt or cardstock will work)
- Black marker
Instructions:
Explore your neighborhood or local park for a few good branches. These should be between 1-2 feet in length. My kids thought this was the best part and we came home with more than a handful of sticks! You’ll want to consider the final location of your Gratitude Tree before deciding how large to make it. Ours is going to live on the table as a centerpiece so it’s not super huge.
Arrange a few branches to look like a small tree.
Insert the branches into a mason jar or small pot. We use mason jars for everything in our house so this was a no-brainer!
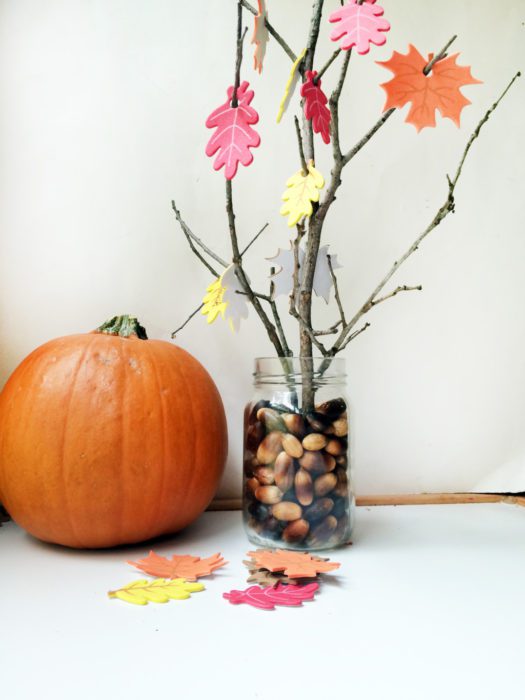
Fill the jar with acorns or rocks to help anchor the branches.
Cut out your leaves. You’ll want between 20-30 in total to make the tree look full. I went with pre-cut foam pieces from the local craft store.
Use a hole punch to make a single hole in each leaf.
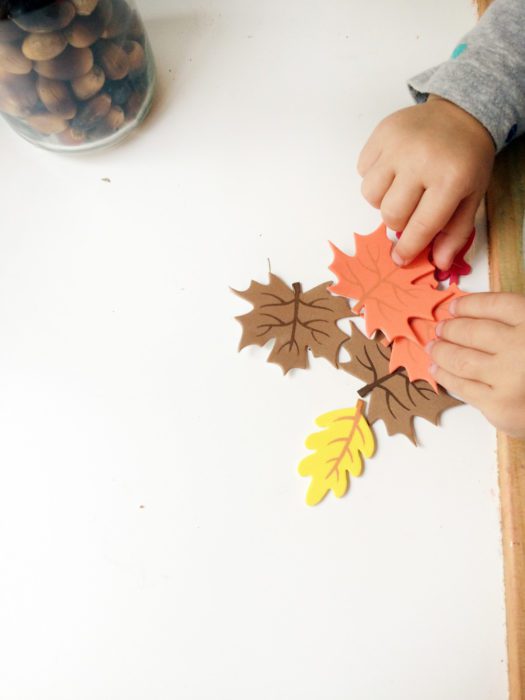
Write one person, place or thing you are grateful for on each leaf.
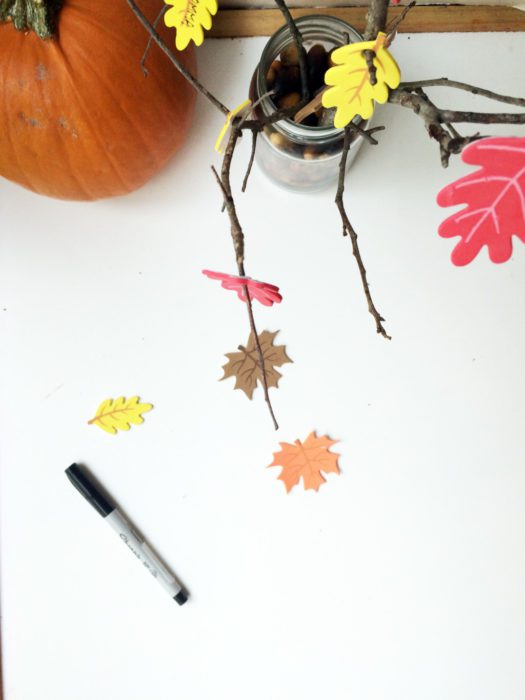
From here you can choose to hang the leaves directly on the branches, or use string to hang them off each branch.
Store the extra leaves close by so guests can fill them out too.
In our home, each night before we sit down to dinner I take the time to ask everyone, “What are you thankful for today?”
Then, we write our answers on the colored foam leaves I grabbed from the local craft store. I’m so excited for the end of the month when our Gratitude Tree will be full of thanks!
This was such a great opportunity to talk to my kids about gratitude. Since they are still small, I explained this as appreciating the feelings of joy, love and also some of the things that make us smile. For example my son choose his Gramme, (she recently visited for Halloween) and my daughter said, “Trick or Treat!” We know chocolate is apparently the key to her heart. Mine was wine. We all have our things.
You could also put a twist on this activity by asking guests to your Thanksgiving meal to add their own blessings to the tree, or create another tree just for Thanksgiving Day, or turn this craft into a game by inviting everyone to guess who wrote what as you sit down to eat that delicious turkey.
Celebrate the things in life that matter most to you this month by teaching your little ones about gratitude with this fun and easy Gratitude Tree activity. We had so much fun putting ours together it may just become an annual traditional!
Have a wonderful Thanksgiving!


