
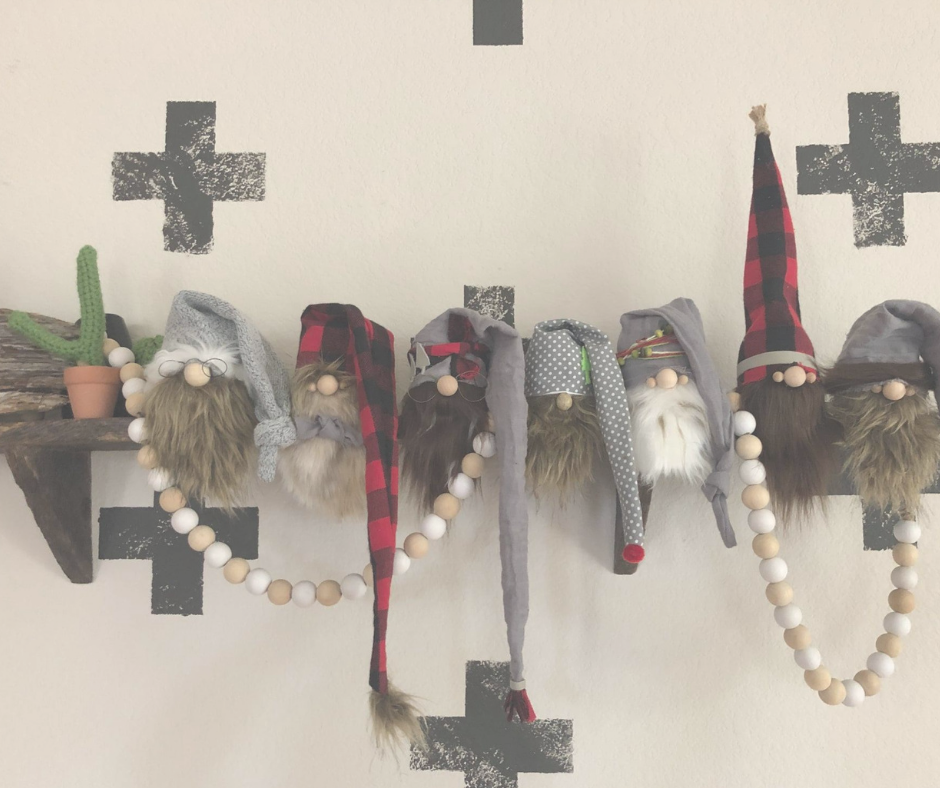


Appears that gnomes are all the rage this holiday season.
And boy have I drank the juice. Heck, I think I’ve bathed in it because I’ve gnome off the deep end. I can’t even count the amount of gnomes I’ve made already this year for friends and family, and I’m certain I won’t stop there.


Want to join in the craze, but don’t want to pay a boatload for these adorable lil’ dudes?
Here’s how you can get in on the action and save yourself a pretty penny (and for some, fund a new addiction):
- hot glue gun
- 1 sock (any color, any size)
- dried lavender (optional)
- a mason jar or a similar type of wide-opening jar
- ~ 10” x 16” piece of fabric for a gnome hat
- ~ 5″ x 5″ piece of faux fur for the beard
- ~ 1 cup of rice (or dried legumes of some kind)
- scissors
- sewing machine (optional)
- ruler or a straight edge
- 3/4″ – 1″ wooden bead (with or without holes)
- decorations for your fabulous gnome (optional)
Step 1: Plug in your hot glue gun and then find an old, lonely sock. We had so many laying around the house that that’s what actually sparked my interest in wanting to make something with them! If you can’t find any stragglers, use an outgrown pair or maybe some of your own that you don’t like all that much.
Step 2: Place your sock, stretched over the brim of a jar. Trust me, this will make it so much easier to fill your sock with your material than attempting to hold with one hand and pour with another. Once your sock is stretched, pour in rice till your gnome head is the size you would like. (I legit have made so many of these, and couldn’t be bothered to go to the store in-between, that most of my guys are filled with ridiculously expensive organic lentils, rice, barley and/or split peas. Don’t make that mistake and get your hands on some cheap-o rice before you begin!) Try adding in dried lavender for a peaceful smell or even dehydrated citrus for some zing.
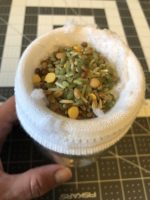
Step 3: Once it’s full to the capacity that you’d like, either tie off the top of the sock and cut off the excess, or sew the top shut (and again, trim off any excess). If you choose to sew this shut, your sewing skills do not matter much here as it’ll be covered by your gnome’s amazing hat! I suppose you could also just hot glue the bad boy together?
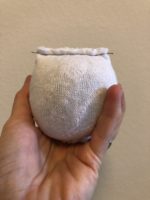
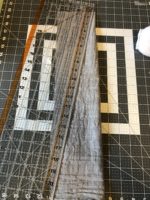
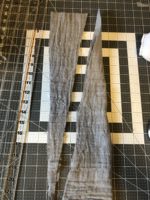
Step 4: Measure the circumference of the ‘head’ you’ve just made. Add 1 inch to that. We will call your head measurement ‘H.’ Cut a piece of pre-washed fabric H x 16” (longer than 16” if you want a longer hat, shorter than 16” if you would rather it shorter and able to stand up straight). Fold the cut piece of fabric in half lengthwise, and then cut from one lower corner to top, opposite corner. At this point, it does not matter which bottom corner from which you start. After you’ve made the cut, choose to work with the piece that has the fold (not the piece that is now two pieces.) Discard/put aside the piece you will not be using.
Step 5: If you have a fabric with a pattern, now is the time to fold your fabric so that the right sides (the sides you ultimately want to be seen) are together. (facing one another on the inside of your fold). We will inside-out this hat once we are done for a more neat seam. Sew or hot glue the entire length of the hat, making sure not to sew shut the opening on the bottom.
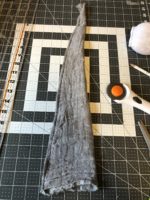
Step 6: Flip your fabric so the right sides are showing. You may want to use a pencil to get the very tip top undone. You’re done with your gnome hat! Set it aside for now.
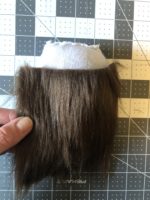
Step 7: Once again measure the circumference of your gnome’s head, at the widest width. Divide that width by 2. We will called that measurement ’B.’ Cut a piece of faux fur B x 5” (making sure you note the direction that your fur is laying before cutting).
Step 8: Glue down your beard. Using the hot glue gun, apply glue along the top rim of your beard. Make sure you’re laying it centered in the middle of your head. Trim and shape your beard once the glue has dried. Note: You could also do this step before gluing if that’s easier for you too. I prefer to do it after so that I can really see how the beard will be laying on my gnome’s face.
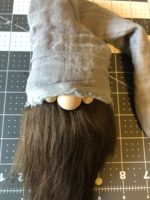
Step 9: Put the hat on your gnome and glue it down, making sure not to apply glue to the front center. I find that it’s best to put the hat on without glue (covering the beard line in all places) and then go through and randomly apply beads of glue in 2-3 spots. I also like for my hat to rest lower in the back than in the front so that it appears more slouchy.

Step 10: Once your hat is adhered and dried, find your wooden bead and apply a dollop of hot glue to it. Apply the bead right in the center of your head just below the hat and directly on the beard fur. If you like the look of a scrunched hat, place the bead just under your hat fabric as well (this is why we didn’t apply glue here yet). If you like the look of a wider nose, try adding two smaller wood beads to the left and right side of the center one. Don’t have any wood beads? Try an acorn or a rock or a marble!
Step 11: Your basic gnome is done. Decorate as you see fit or leave him clean and simple.

Need some ideas on how to spice up your gnome?
- Try making it some glasses out of thin crafting wire
- Add different color fur to the beard for more texture
- Sprinkle glitter on the hat for some ‘magic’
- Wrap a band of fur, ribbon or jute around the brim of the hat
- Sew or glue a tassel or pom pom to the end of the long cap
- Glue the head to a giant pinecone for a Forest-friendly look
- Add a button somewhere

The options and decorations are limitless.
The important thing is to have fun making your newest lil’ member. Also, if you choose to fill the sock with rice and not add any decorative metal (i.e. wire glasses), your gnome can double as a personal heater. My kiddos love to sleep with their lavender and rice-filled gnomes on cold nights. Just plop your new friend in the microwave for 30 second increments (it’s okay, he likes it) until he’s satisfyingly warm and ready to soothe.


